Pages

Showing posts with label tutorial. Show all posts

Monday, June 18, 2012

[sunshine quilt] tutorial


This was inspired by a quilt I saw on Pinterest. You can see it HERE! But I added my own twist to it.

{She has a great tutorial to go along with it as well! So if mine doesn't make sense, check hers out!}

I have a special place in my heart for the song, "You are my Sunshine" so I wanted to incorporate that for my friend and her new baby girl somehow.

And this is what I came up with!


{You can see more pics of it HERE}


Here's how you make it!

{Just like with my last quilt tutorial, this one also requires at least some basic knowledge of quilt making. If you live in AZ and want to learn how to make quilts, I highly recommend taking the beginning quilt class at ETC!}

Supplies:

1 yard of muslin or neutral
Scraps for the pennant flags {Enough fabric to make 16 4x4 squares}
Scraps for the sun {a few fat quarters should be plenty!}
1/2 yard for inner border
1 yard for outer border
1/2 yard for binding
3 yards of wonder under
2 yards for backing
Batting (crib size)
Coordinating thread {I used off white for the whole thing!}
Embroidery floss

1} Cut out a 36" x 30" piece with your muslin.


I ironed it and laid mine out on our ping pong craft table to get it ready to lay my flags out on.


I determined the composition of my pennant flags by drawing it out on paper numerous times and finally came up with this!


Next I cut out 16 4"x4" squares in coordinating fabrics and 16 4"x4" squares in wonder under. I believe I used about 13 different scraps of fabric. I ironed the two together and once that was finished I took a water soluble fabric pen and on each square on one side marked the half way point (2") and then drew a line from that mark to the two corners on the opposite side to make my triangle/pennant flag.


Then I cut them out!


Save your scraps! Cause you'll be taking those and cutting out your 17 little pennant flags.


I took one of the two scraps (doesn't matter which) and marked 1 3/4" from the corner on each side.


Cut along that line and you now have a little pennant flag. You'll need 17 of them total.

Now using the water soluble fabric pen, draw 4 swooping lines on your muslin/neutral fabric where you'll want the pennant flags to go. Take your muslin and your flags over to the ironing board and first lay out your little flags {make sure you leave an inch or two from the edge for seam allowance} and then start ironing them on. The large flags can be ironed on next.


This is what it should look like when you're done.

Next cut out a 7" square of fabric and wonder under for your sun. Iron them together. Take a some cardstock or any thick paper and cut out a 5 1/2" circle. Trace the circle on the fabric and cut out.

I took my leftover yellow pieces from my large pennant flags and very randomly cut out triangles. Didn't measure them or make them look perfect. Just cut them out so they were all in different sizes. They all varied in size from 2 1/2" to 1".

I arranged the sun and the rays on the muslin till I was happy with how it looked. I pinned them in place and took it over to the ironing board and ironed them on.


I then prematurely drew the face on and with my fabric pen. {I would wait till after you applique the flags and sun on to do this}

After everything was ironed on, I used a zig zag stitch and appliqued like crazy.

TIPS:

Zig zag stitch along the top of the large pennant flags in a long swooping line and then go back and stitch along each side of the flags.

Stitch the little pennant flags last! Avoid stitching over the larger flags.

After the applique was done, I worked on the embroidery.

I redrew the sun's face and wrote out in Word "you are my sunshine" in a font called "The only exception". You can find that font for free HERE.

It's up to you how big you want the wording to be. After I printed it out, I laid it under the muslin so I could then trace the wording with my fabric pen.

Next I turned on the Food Network, got a needle and some embroidery floss, and stitched the wording and sun's face using a back stitch.


I then cut out 4 2 1/2" x WOF strips for the inner border and sewed them on. And like I mentioned in my previous post, I was able to use my daughter's old curtains for not only this part, but for some of the flags and the backing too! Great way to save money!

After that was finished and I pressed the seams, I then cut out 5 5" x WOF strips for the outer border. I cut one of those strips in half and pieced each one with one of the other strips of fabric making 2 longer strips.

I sewed those on and pressed the seams.

And TA-DA! Top is finished! Finished this in 5 hrs!
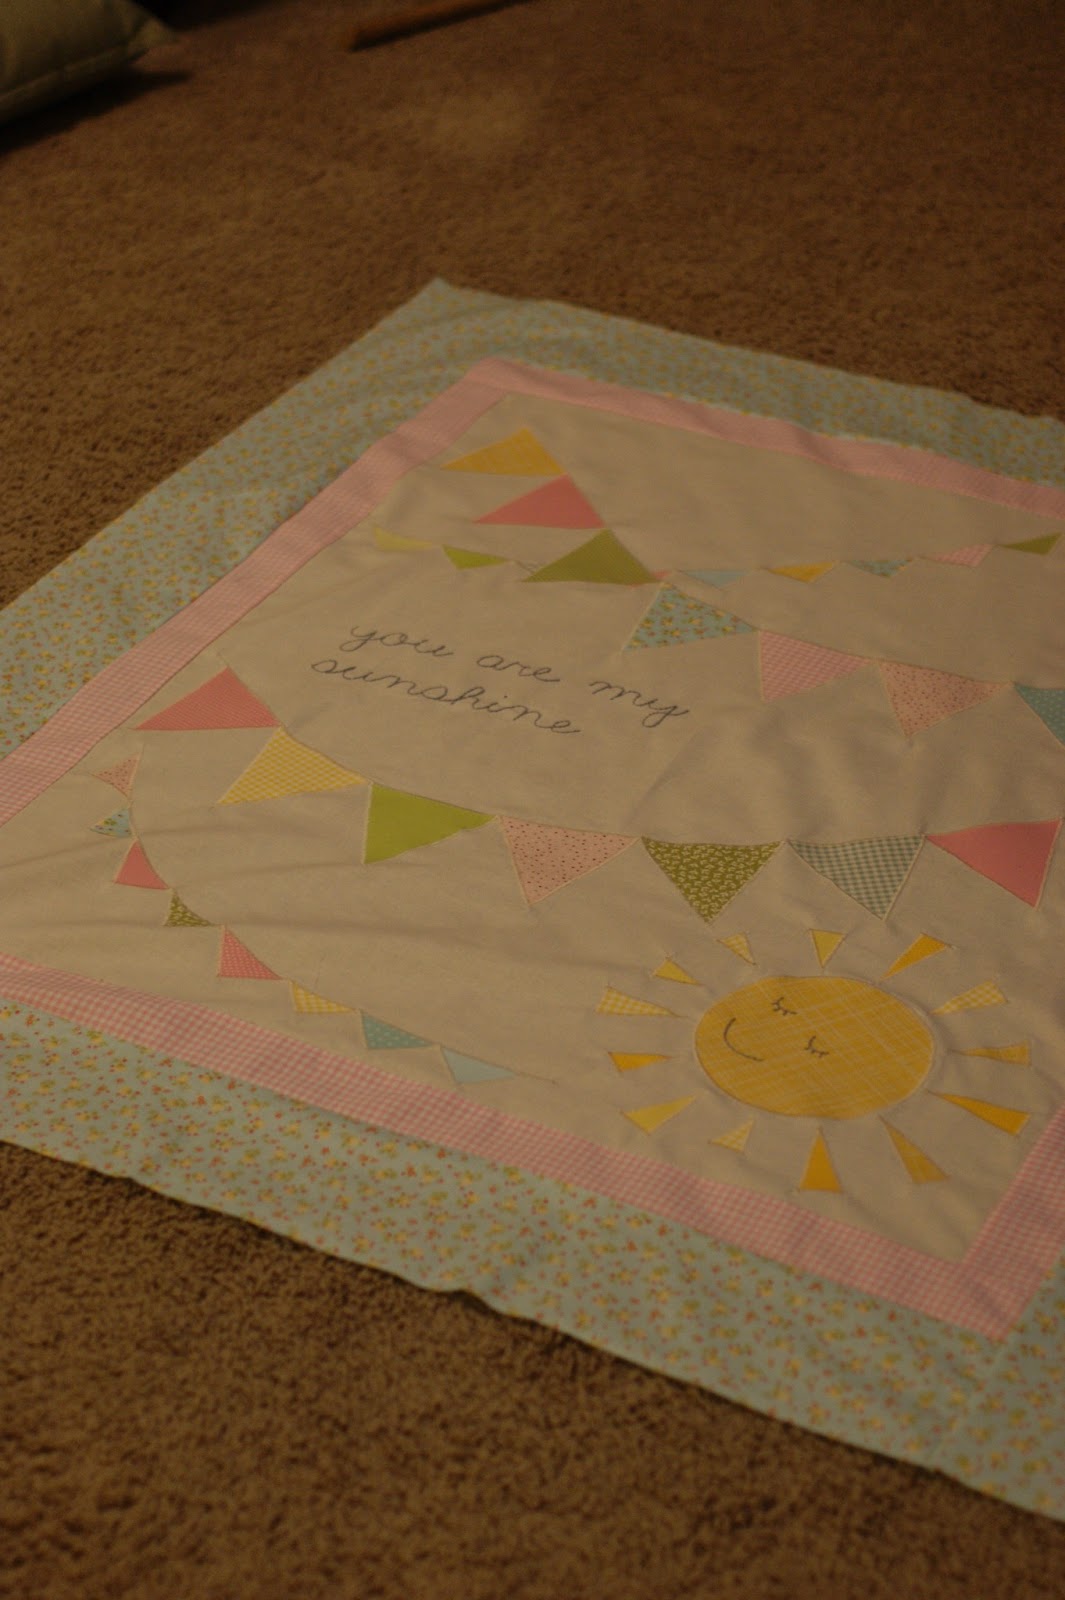

This part is optional, but I then had my blanket quilted by a professional. You could TOTALLY do this part yourself! But I didn't have the time, nor the faith, to do it myself.

Once I got it back from the quilter, I cut out 6 2 1/4"x WOF strips for the binding, sewed it on, washed it, and this is how it turned out!


Pretty happy with how it looks and can't wait to hear what my friend, Kim, thinks about it! And also to see pics of her baby girl wrapped up in it too.

This quilt was so easy and inexpensive. A great way to use all those scraps!

Any questions about the project, feel free to post in the comment section below!

<3
Lindsey

Tuesday, February 14, 2012

[EASIEST Baby Doll] Tutorial

Heeeey everyone!

Super duper excited to show you this newest tutorial!

(Pics of it at the very bottom. Just keep scrolling. Keep scrolling. Scroll some more. And....you're....there!)

If you're a beginner sewer, like myself, you can make this. I promise!

And if you're an advanced sewer, you will laugh at it and go, "Phsh. I can make this 10 times better!"

And you will. But afterwards, can you share how awesomer yours is with me?

Thanks.

So I got the idea to make this doll because I'm going to be an aunt again!

As some of you may remember I have a little niece, Logynn. She's my brother's little girl.


I love her to death.

Well, my brother and sister-in-law just found out they're having another girl. <yipee!>

And what better way to get Logynn ready for her sister's arrival then a baby doll made by the greatest (and most humblest) Aunt in the world.

So I'm 110% sure this is not an original idea. I'm positive someone has already made this or something similar in the history of the universe. So not taking credit for it. But because I'm lazy, I didn't take the time to do the research to find a tutorial or pattern and just went ahead and made it. And let me add that I've NEVER made anything like this before. So if I can do it, than you can too.

YOU CAN DO IT!

That's my pep talk so you will feel a little more confident about tackling this project. I hope it worked cause that's all the pep I got right now.

Ready? Here we go!

I forgot to take a pic of the supplies you'll need (remember I'm lazy?) so here is a list instead:

1) Batting
2) Gray embroidery floss & needle
3) Canvas or whatever fabric you want to use for the baby's face/body (1/4 yard)
4) Coordinating fabric (1/4 yard)
5) Minky (1/3 yard)
6) White ruffle trim
7) Pink and white thread
8) Thin ribbon for hair (I used brown grosgrain)
9) Disappearing ink pen for fabric
10) Fray check

Other recommended supplies: 6 x 12-24" acrylic ruler, rotary cutter, and washable glue stick.

I apologize in advanced for the potentially confusing instructions. I'm horrible at explaining things, yet I have a blog with tutorials. It's a mind bender, I know.

First step is to cut two 6" x 12" fabric pieces, one of them will be on the minky and the other on the off-white canvas.


Next using cardstock or any thick paper, cut out a 6" circle. Lay it at the top and using your fabric marker trace around the top two corners of your fabric. Then cut the two corners so they're both round.


And they'll look like this!


Now take your coordinating fabric that you'll use for the baby's "outfit" and cut it in a 6" x 6" square.


Fold it in a 1/4" and iron down. Take your glue stick and glue it on or just pin it  8 1/2" up from the bottom.
Then sew like so!


Ok this part may be confusing, so bear with me...You'll want to cut out 2 6" x 9 1/2" strips of minky.

Take one corner and fold it in so it looks like the pic below.


Now take your acrylic ruler and rotary cutter and slide the ruler carefully underneath the triangle.


Open it up and use your rotary cutter to cut along the edge of the ruler. Repeat with other strip of minky.

Now taking lots of pins, pin one of the minky strips onto the front of the doll. Fold the minky around the top to make a hem and pin as you go. Then sew it on.


Repeat with other strip of minky.


Should look like this when you're done. Or better for the advanced sewers since I sorta made this up as I went. And notice how I only sewed along the top and the diagonal side. I also sewed along the bottom, close to the edge, just to make it easier to all sew together at the bottom later.

Now take your fabric marker and draw the face on. The less perfect it is the better. No one likes a perfect face.


Using your grey thread backstitch the eyes and mouth on.


Next, trim 3" pieces of ribbon for the hair. Apply the Fray Check to the ends on one side. Take a hot glue gun and glue them in place.

Once the glue is dry, take the ruffle trim and glue it along the edge of the top of the head so the ruffle is facing in.


Trim off the excess hair ribbon, leaving about 1/2" left. Take your minky you cut at the beginning and with the 2 fronts facing each other pin them together.

When sewing them together, make sure you leave an opening at the bottom big enough for your hand to squeeze through. I like to start at the bottom about an inch or two away from the corner and then once I reach the other side sew around the other bottom corner too. Cause there's nothing worse then having to hand stitch corners closed. Nothing.


Should look like this when you're done. Now get it right side out and start stuffing!


Once you have it completely stuffed. You'll want to hand sew the bottom closed. And since I'll be horrible at explaining how to do that, I'll just give you a link to a video instead. HERE you go!

If you notice in the pic above I forgot to attach the white ruffley trim at the bottom. Since I'm a beginner sewer, I'm not sure how you would have done that beforehand so I'll just explain what I did to fix it. I applied some Fray Check to be safe along the bottom. Then took white thread and just sewed the bottom corners to the top of the minky. The pics below might help explain what I'm talking about better...Thank goodness for visuals!

Also, I took a small brush and some of my blush and gave the baby a makeover. Suh cute.

And here is how she turned out!


I'll post pics of my niece with it later depending on how well she takes to the new "sister"...fingers are crossed.

Feel free to post any questions or comments (nice ones preferably) below! I'm always happy to assist or give you links to other people assisting you via youtube. Whatever works, right?

<3 Lindsey

Update: SHE LOVES IT! YAY! : )